
Boards, code, and a show builder.
One dongle, one or two receivers, a handful of 8-cue modules, and a web app that runs on a laptop. Here's what each of them does, in detail.
Receiver
assets/img/components/barereceiver.png
assets/img/components/receiver-board.png
assets/img/components/usbcharging.png
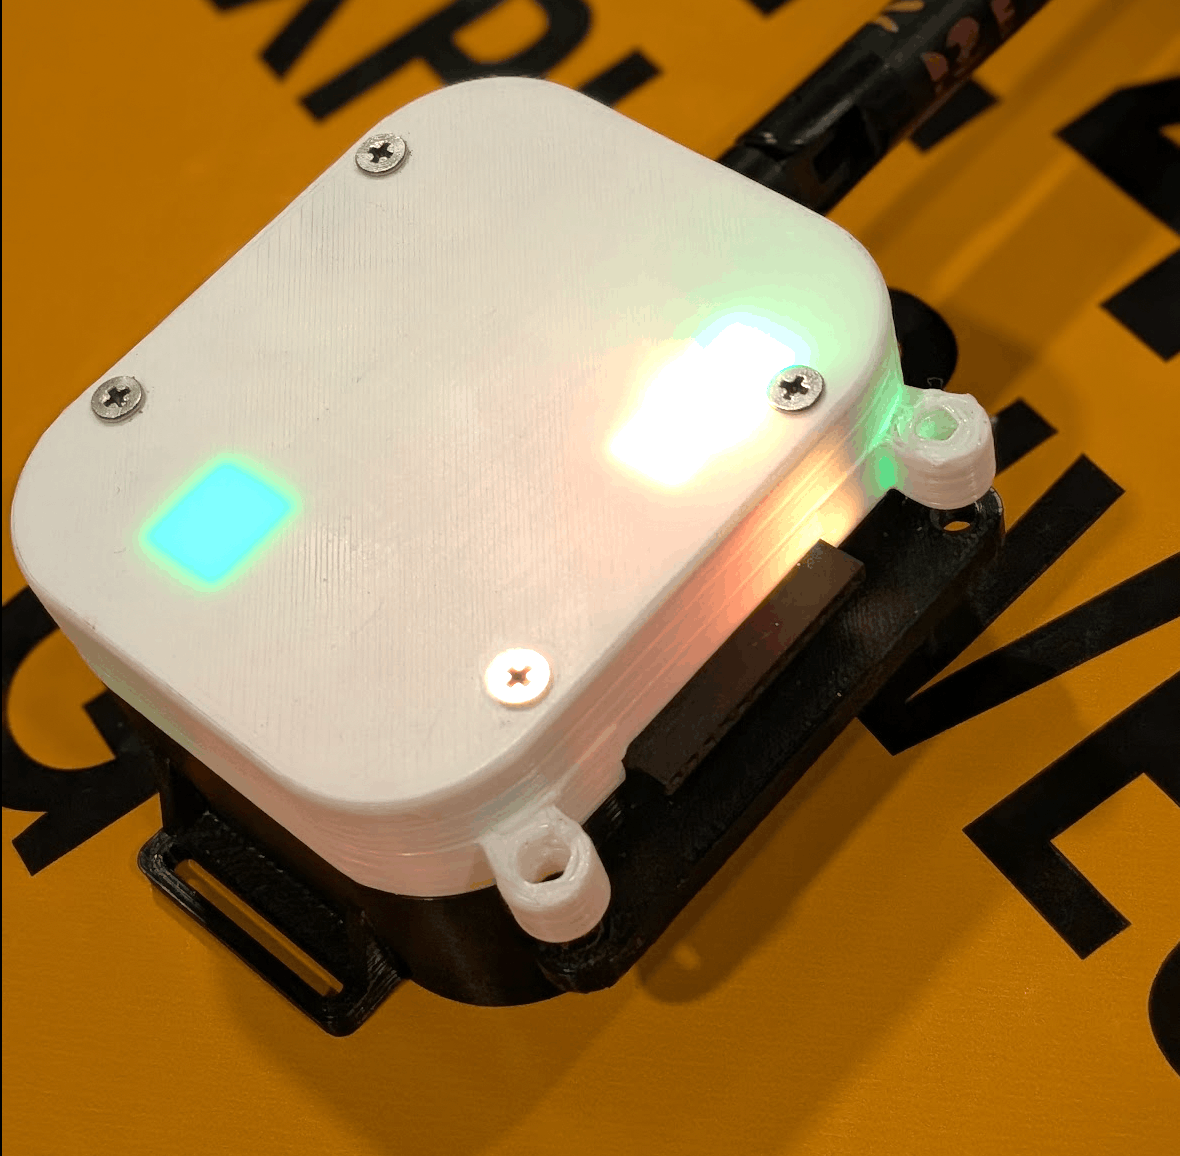
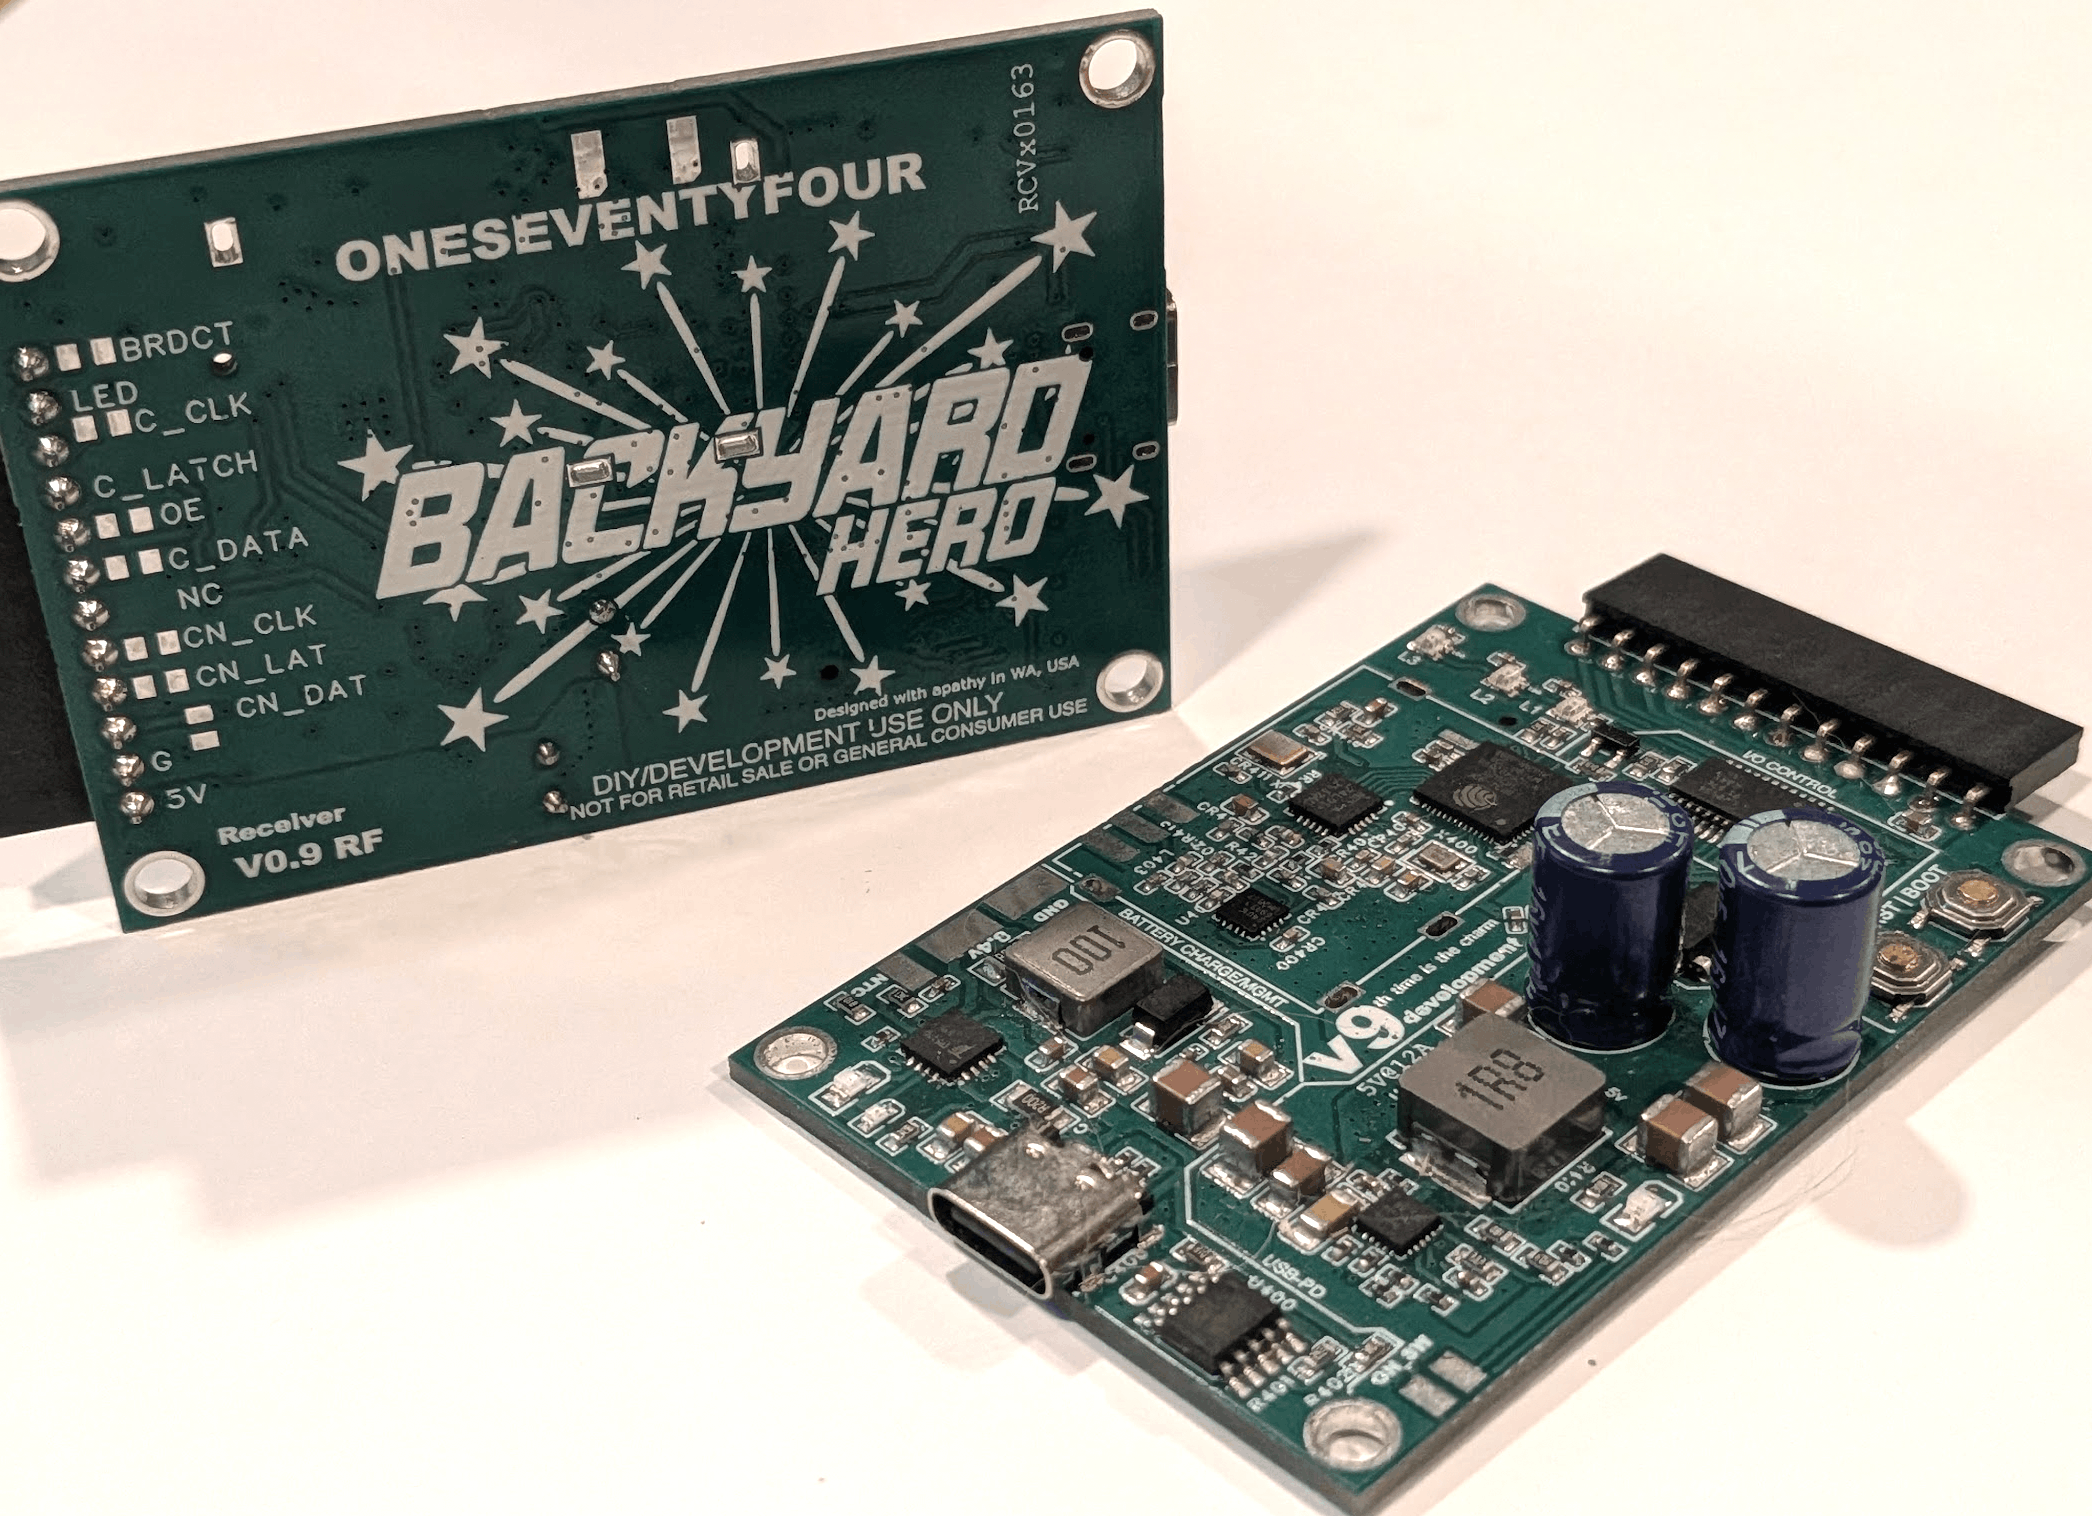
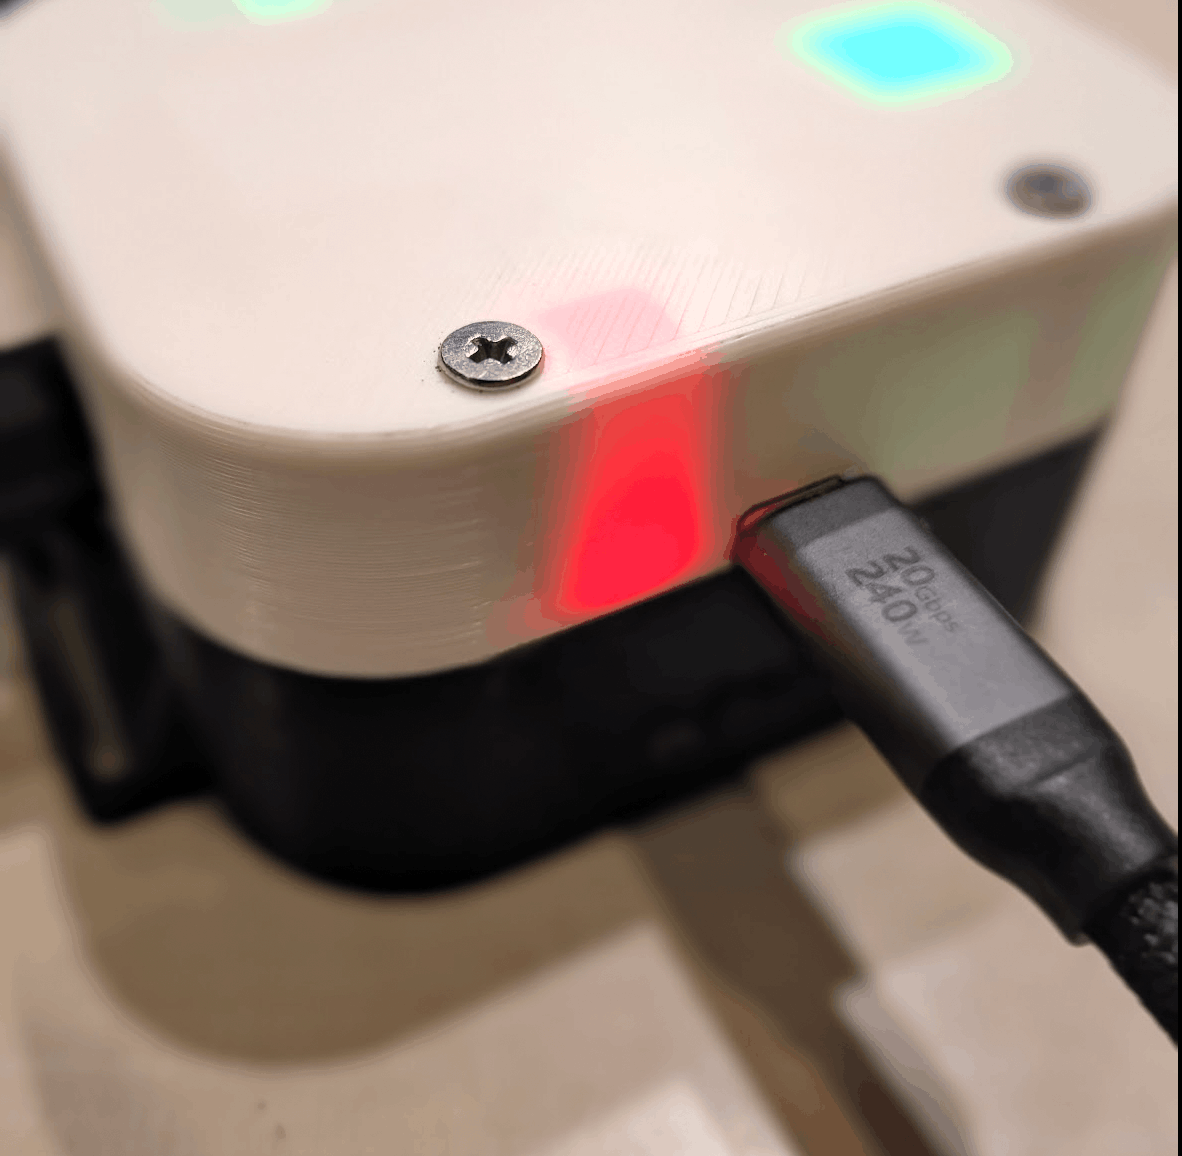
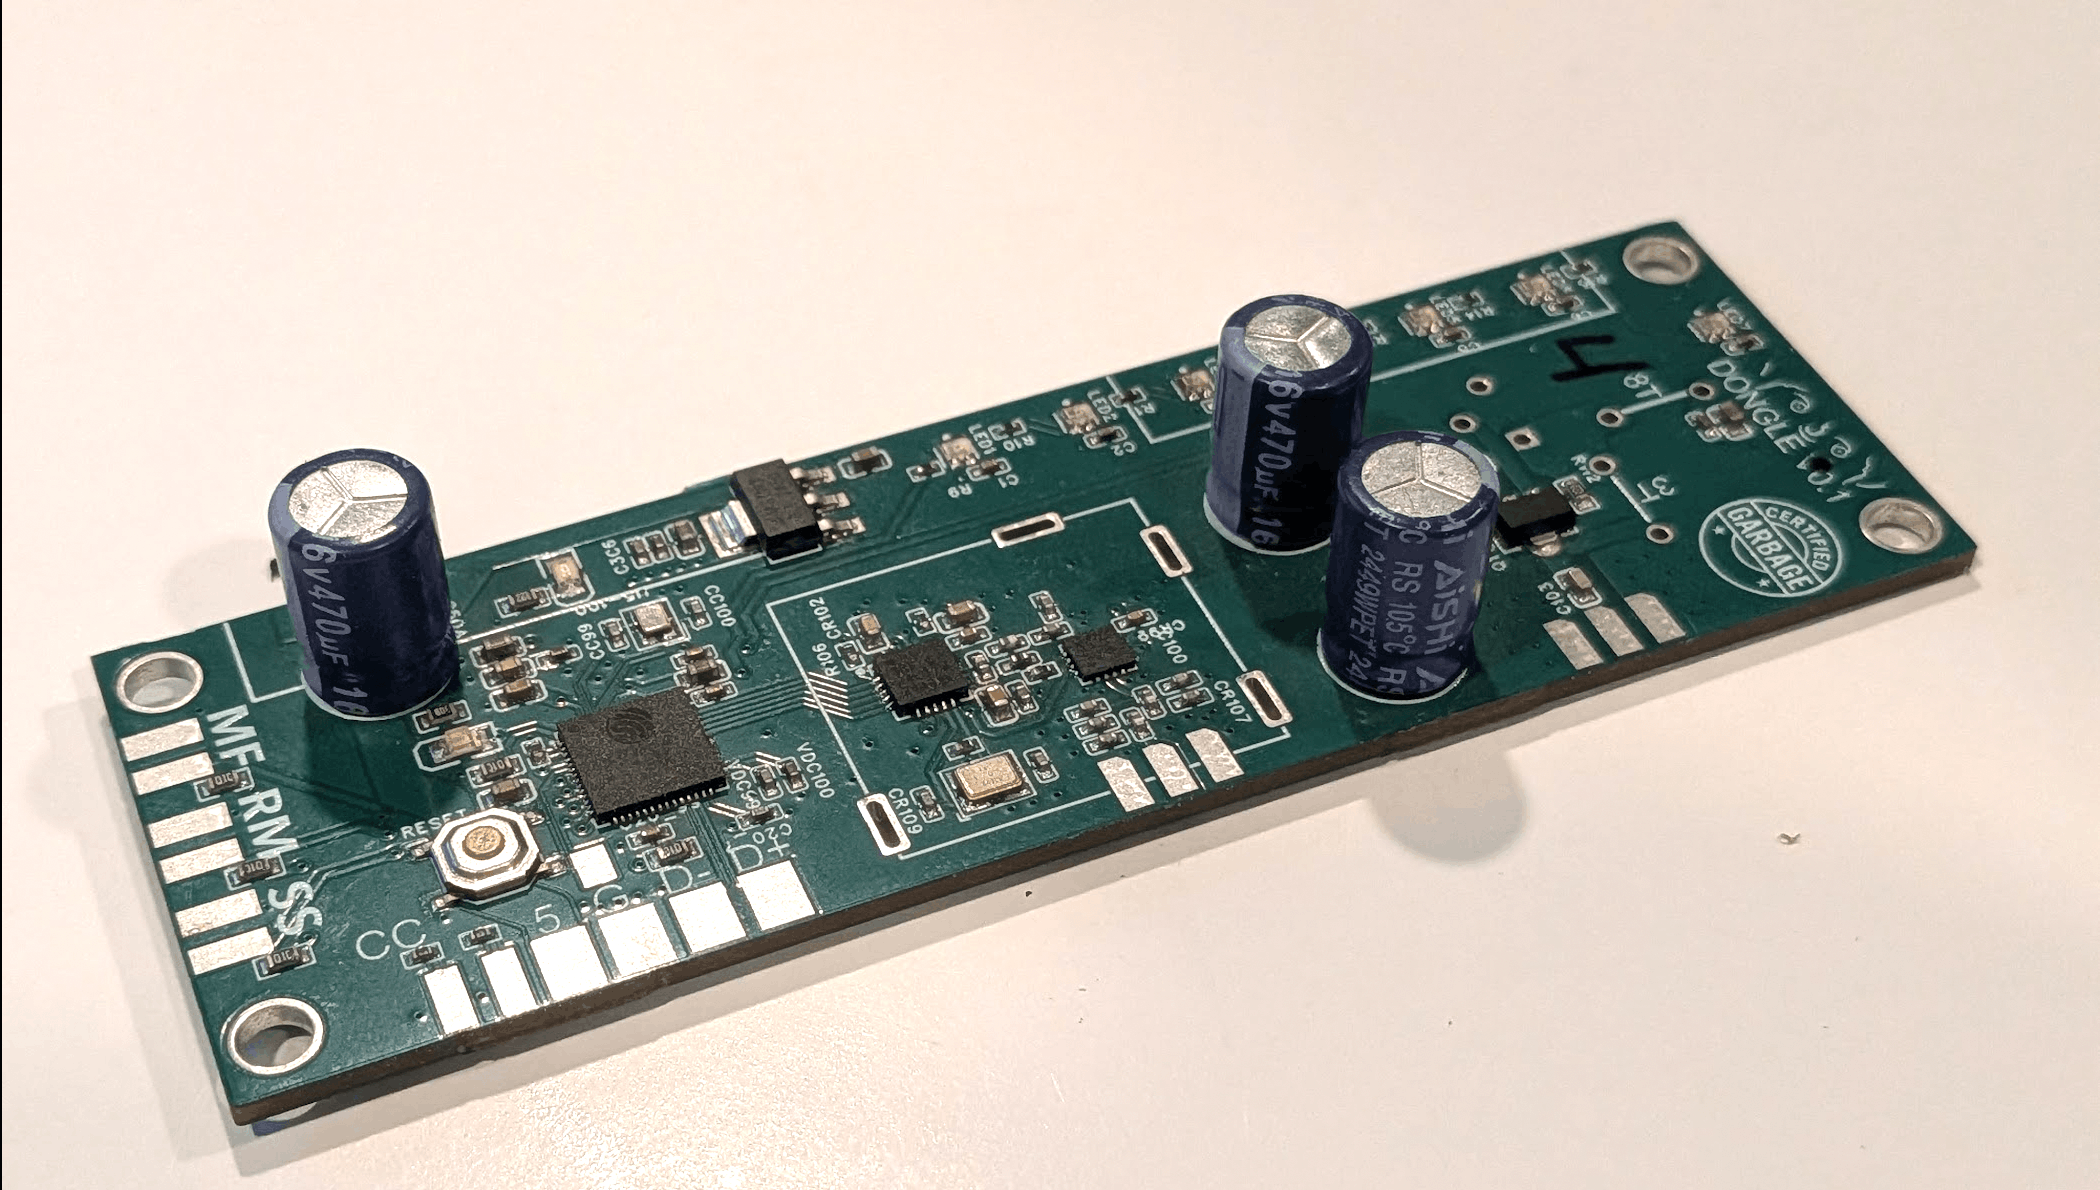
The receiver is the thing that sits next to the racks. Each one carries a custom 2.4 GHz radio with an impedance-matched PA/LNA frontend, an ESP32-S2 running the firing logic, a rechargeable lithium pack, and a daisy bus for cue modules. There is no proprietary programmer: USB-C charges it, USB-C also programs it, and the firmware builds in mainline Arduino or PlatformIO.
Receivers sync to the host's clock at startup and then run autonomously through the show. If the RF link drops mid-show, timing keeps. If contact stays dropped for more than 10 seconds, the receiver stops on its own.
~$27 in materials. A two-receiver, 32-cue starter system runs roughly $110 in materials before the dongle.
- Radio
- 2.4 GHz, custom RF
- Processor
- ESP32-S2
- Range
- 1,000+ yd LOS
- Cues
- 8 – 64 (chainable)
- Battery
- Li-ion, ~24 hr
- Charge
- USB-C PD
- Sync
- < 10 ms cross-RX
- Flash
- USB-C · Arduino / PIO
Cue modules
assets/img/components/cueboards.png
assets/img/components/cuemodule.png
assets/img/components/cue-module.png
assets/img/components/cue-chained.png
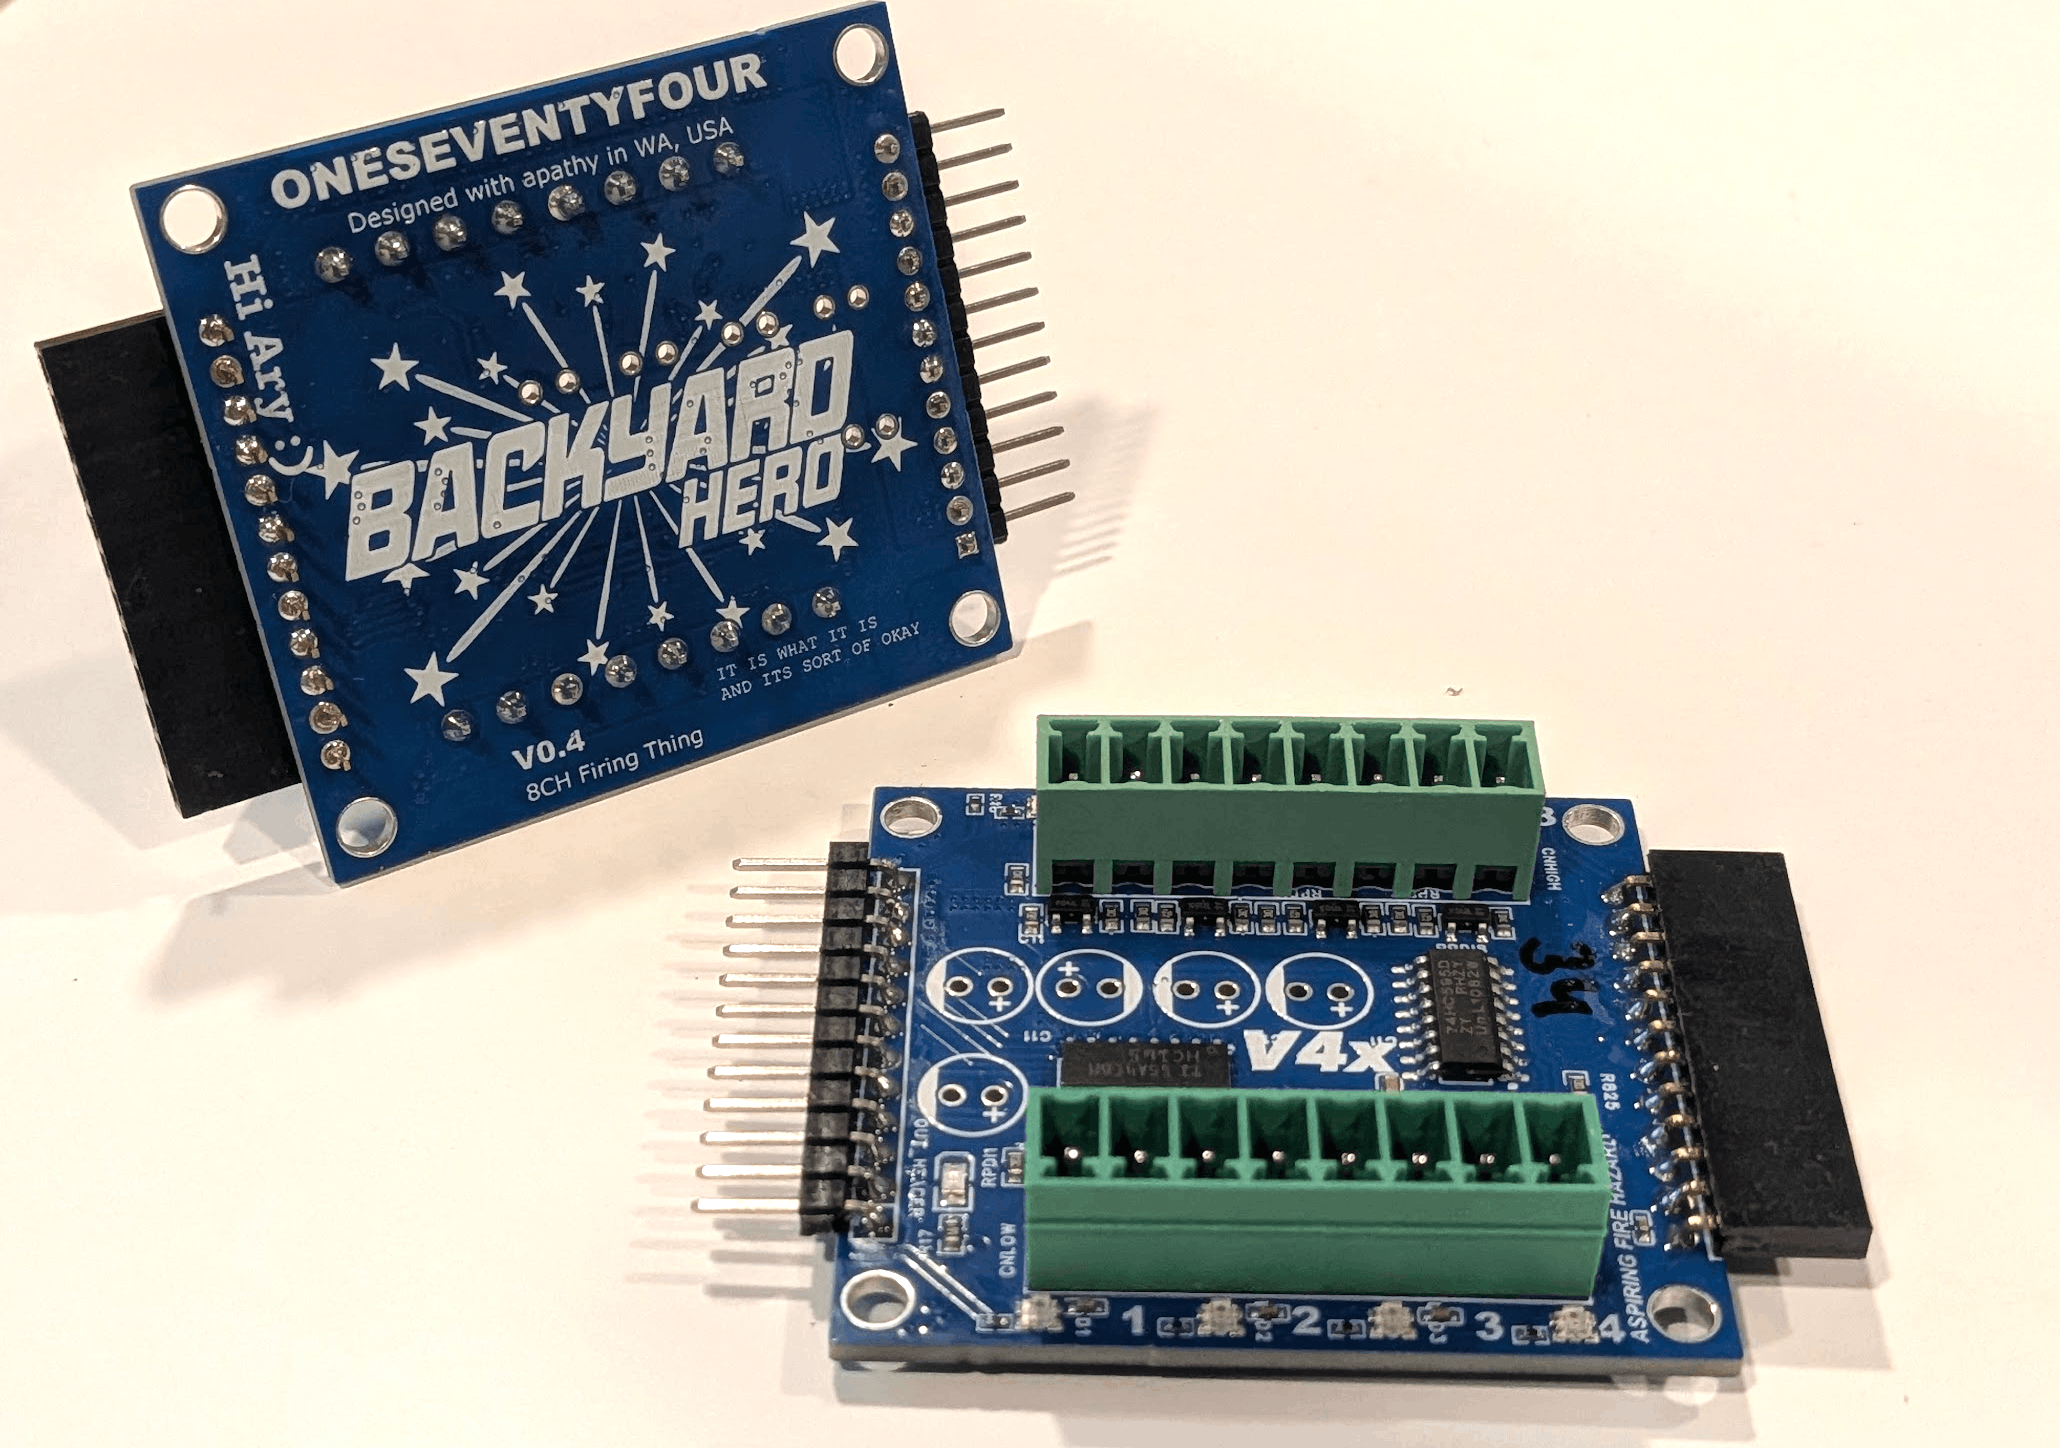
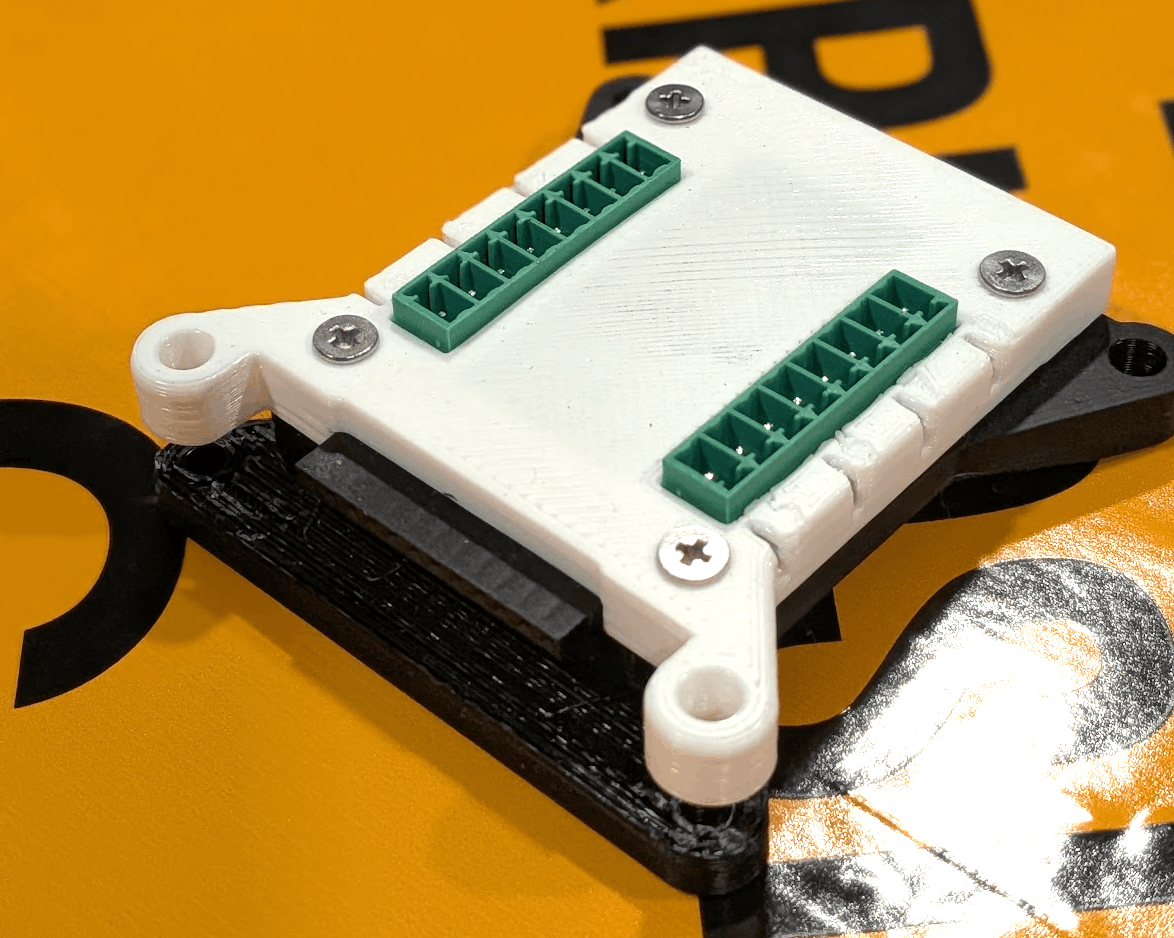
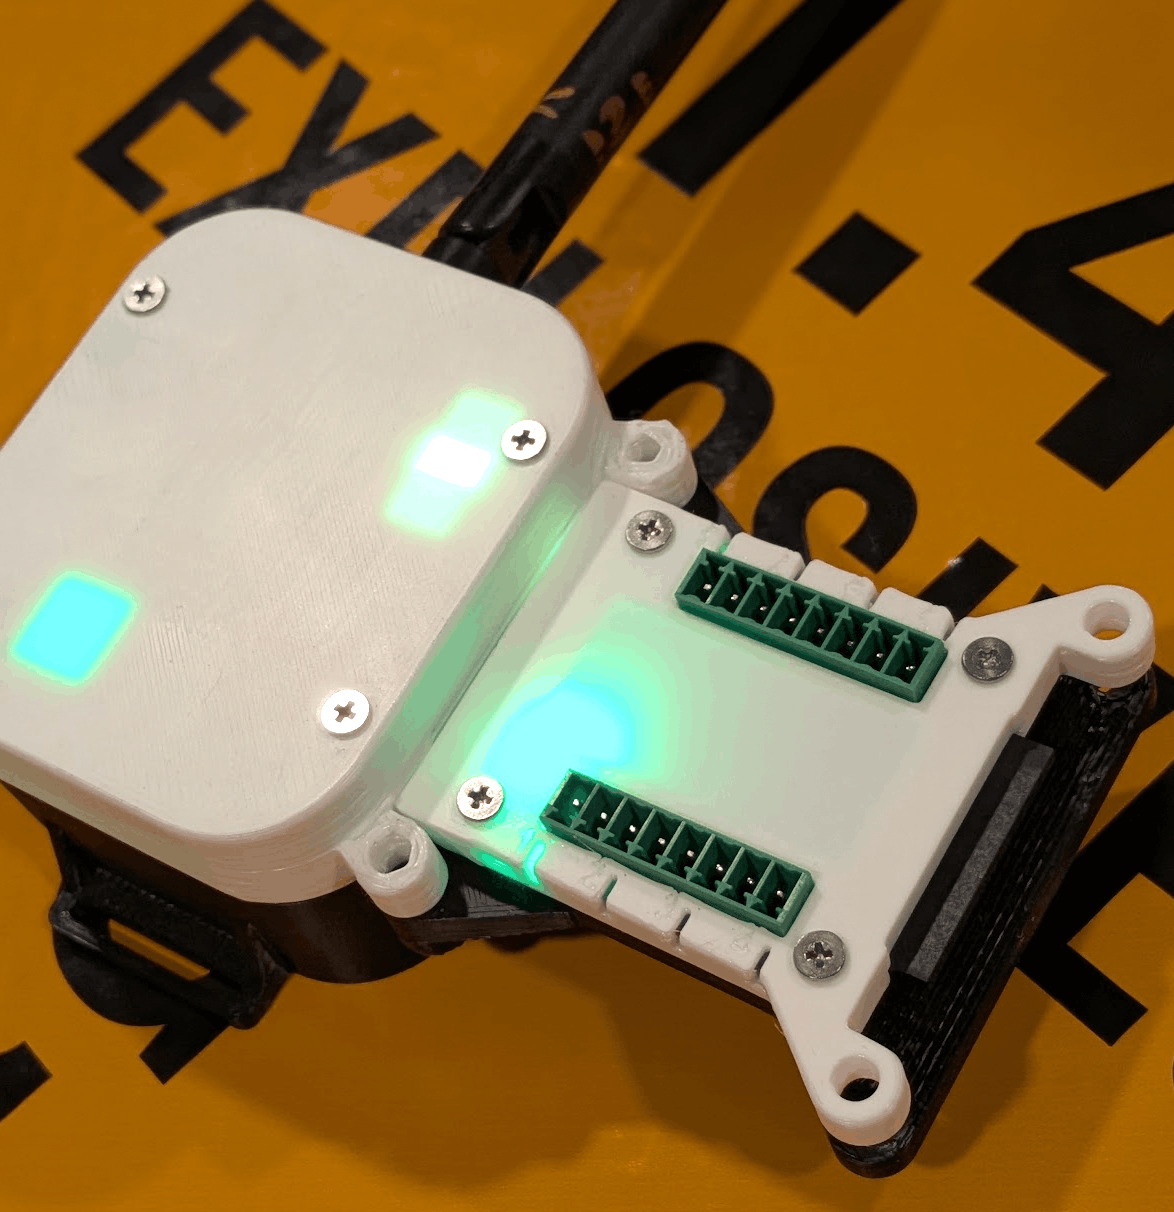
An 8-cue module is the smallest expansion unit. They chain on a simple daisy bus, so adding capacity means buying $8 boards, not another receiver. A receiver supports up to eight of them.
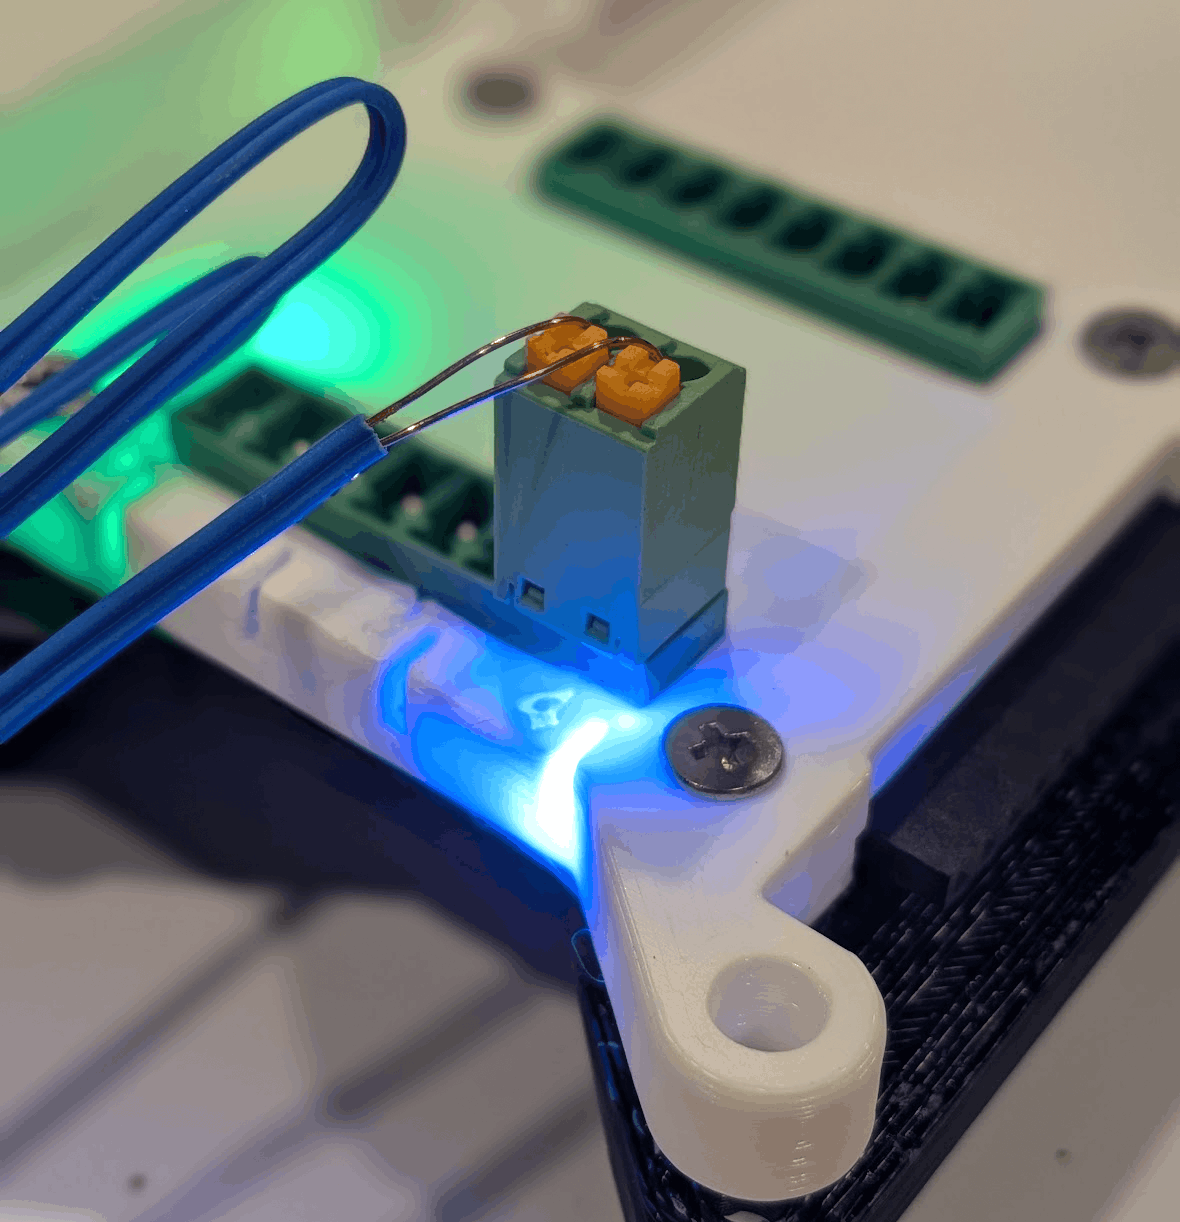
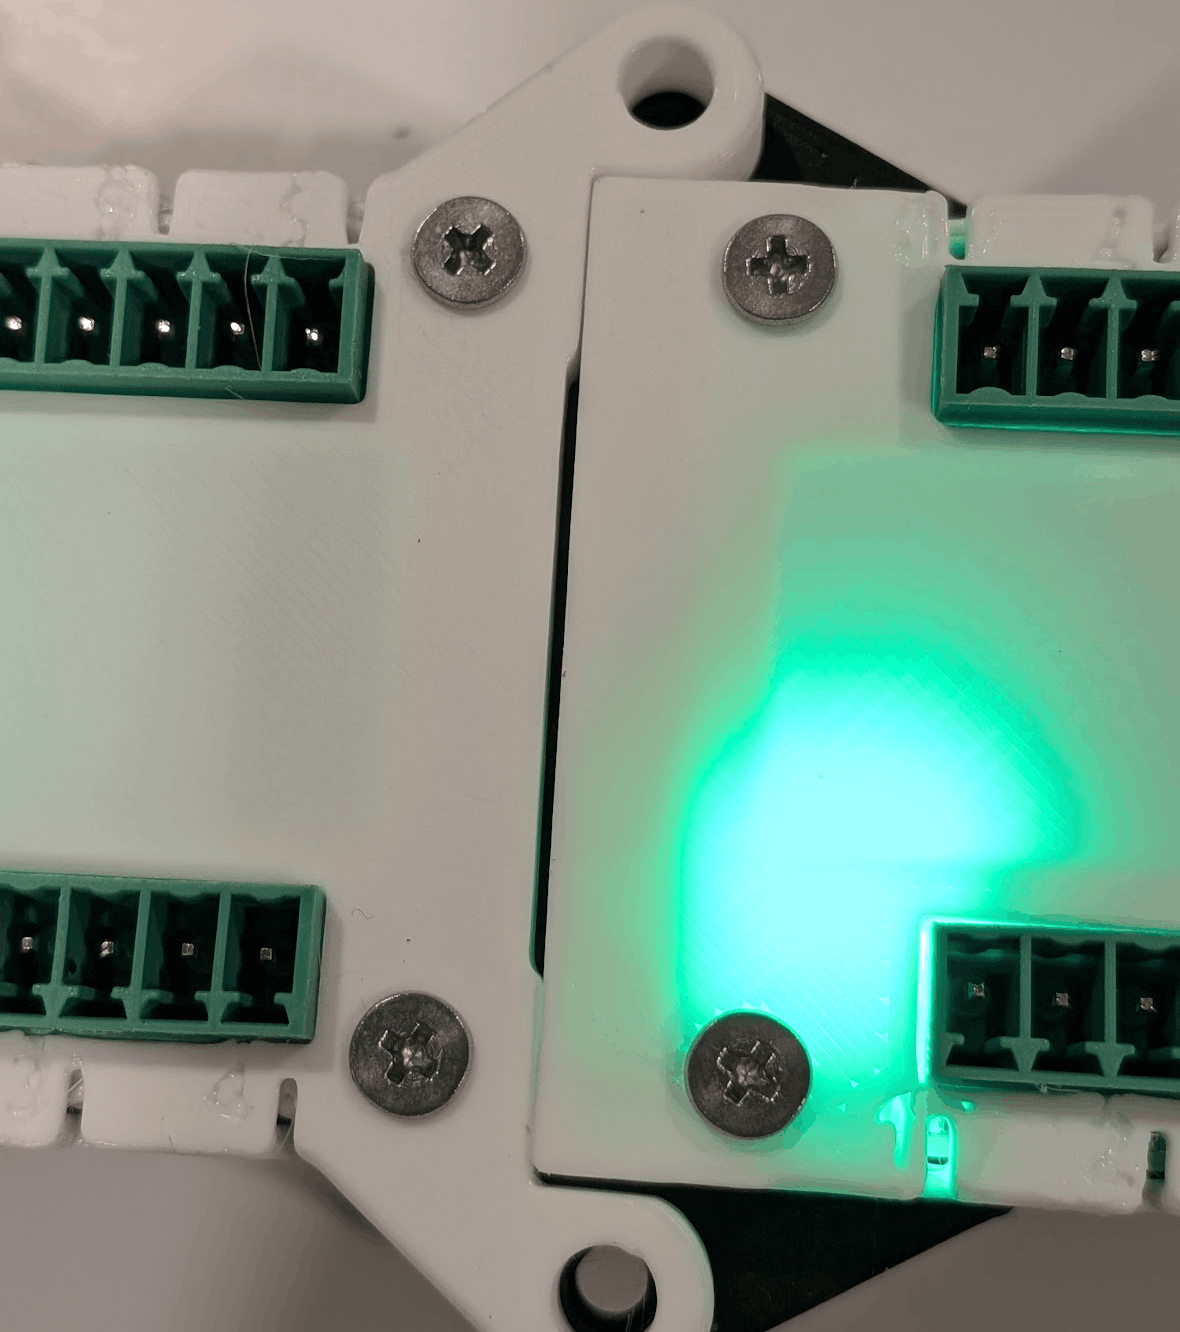
Each channel has its own RGB LED that does the standard pyro-show colour code: red = needs continuity but doesn't have it, green = continuity good, blue = continuity present but the cue isn't used in the loaded show. The same colours are mirrored in the per-receiver continuity grid on the host, so what you see on the field matches what you see on the screen.
Channels can deliver enough current for simultaneous firings of common e-fuses (MJG, Talon, and similar). The chain bus handles addressing automatically based on the receiver's systemcfg.json.
Module outputs are modular and support either screw-terminal or push-terminal connection styles, depending on how you prefer to wire and service your racks.
~$8 in materials per 8-cue module.
- Channels
- 8 per module
- Chain
- up to 8 modules / receiver (64 cues)
- Per-channel
- RGB indicator
- E-fuses
- MJG, Talon, and similar
- Connect
- modular screw or push terminals
Dongle
assets/img/components/dongle.png
assets/img/components/dongle-board.png
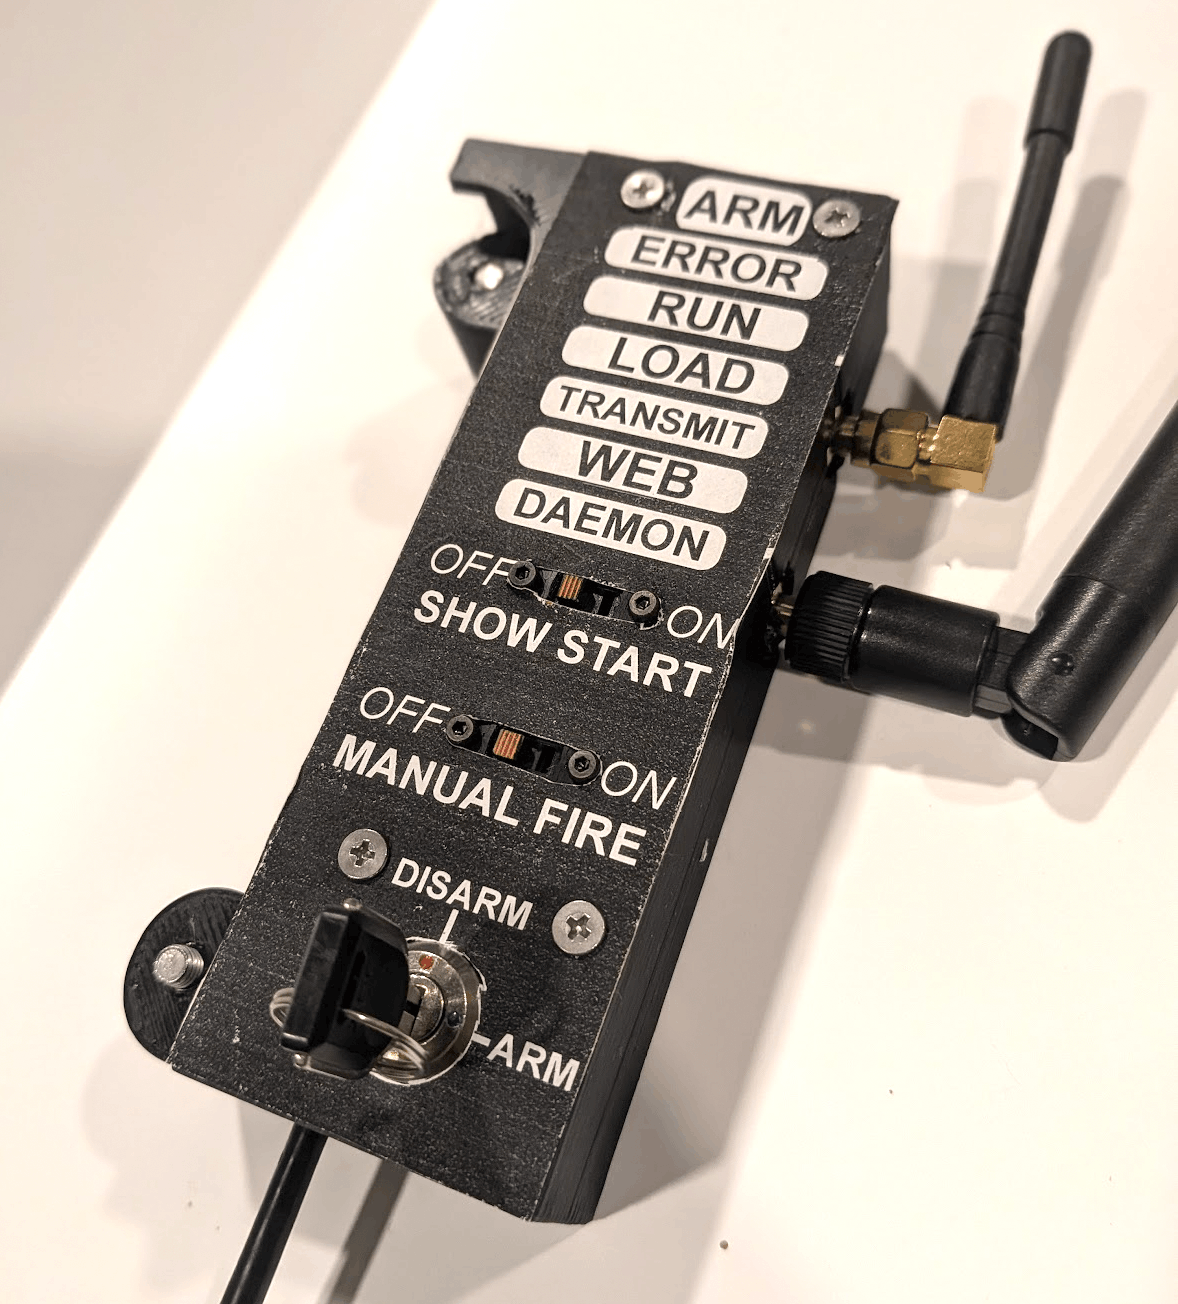
The dongle is the link between your laptop and the field. It plugs into USB-C, exposes a serial port to the host app, and carries two radios: 2.4 GHz for Backyard Hero receivers, and 433 MHz for existing Bilusocn-style hardware. A new build can keep talking to the receivers you already own.
On the side of the dongle is a physical arm / disarm switch. Shows refuse to load while the switch is in stop. Flipping it to stop during a show issues an abort to every receiver instantly. None of this is software-only — the firing system trusts the physical state of that switch.
Enclosure CAD files are in the repo. If you've got a printer and an opinion about form factor, print a different one.
- Host
- USB-C · CDC serial
- Radios
- 2.4 GHz + 433 MHz
- Arming
- Hardware switch
- Protocols
- BYH · Bilusocn
- Materials
- ~$25
- Enclosure
- 3D-printable
Standalone base COMING SOON
assets/img/components/donglebox.jpeg
The standalone base is a one-box version of the DongleBox setup. A Raspberry Pi, dongle, battery, and Wi-Fi access point packaged into a self-contained show editor and field controller that lives with the rest of the kit.
Power it on at the field and connect from a laptop, tablet, or smartphone over its own Wi-Fi. The same show builder UI is available on whichever screen is closest to the racks, so the person wiring can pull up the loadout, run a continuity check, or fire the show without a laptop in the dust.
The DIY DongleBox config on the home page covers the same ground today with off-the-shelf parts. The standalone base is the same idea, ready to use out of the box, for people who'd rather not assemble a Pi setup themselves.
Coming soon. The DongleBox path in the repo and wiki is the supported route until this lands.
Hardware notes
assets/img/components/receiverwithcues.png
A flat list of the things that actually matter on the boards, less the bullet-point card grid.
- Custom RF frontend
- Impedance-matched PA/LNA, not an off-the-shelf module. Measured rather than claimed line-of-sight range of about a thousand yards.
- Channel selection
- Receivers sample the 2.4 GHz band and pick the cleanest channel before the show. No manual hopping at the field.
- Cross-receiver sync
- Sub-10 ms host-time sync. Two pieces fired from different receivers go off within milliseconds of each other.
- Autonomous run
- Once a show starts, receivers run from their own clocks. RF noise during the run can't move your timing.
- Wireless telemetry
- Per-receiver signal, battery, continuity grid, ready count, latency, and success percentage — streamed live to the host.
- Receiver indicators
- Onboard LEDs report sync, battery, and overall health. Readable across a field in low light without the UI.
- Cue indicators
- Per-channel RGB: red = needs continuity, green = good, blue = continuity but unused in the loaded show.
- USB-C PD charging
- 12 V fast charge over the same USB-C charger you already carry. About a day of runtime per receiver.
- E-fuse support
- Enough channel current for simultaneous firings of common e-fuses (MJG, Talon, and similar).
- OTA flashing
- The host UI pushes new firmware to receivers without any external programmer.
- ESP32-S2 platform
- Mainline Arduino / PlatformIO tooling. Plug a receiver into USB, change the code, flash it, and (please) send a PR.
- Bilusocn bridge
- Dongle's 433 MHz radio talks to existing one-way receivers, so legacy gear keeps working.
- Open everything
- Schematics, gerbers, BOMs, and enclosure STLs in the public repo. Build your own, fork it, fab it, print it.
Show builder
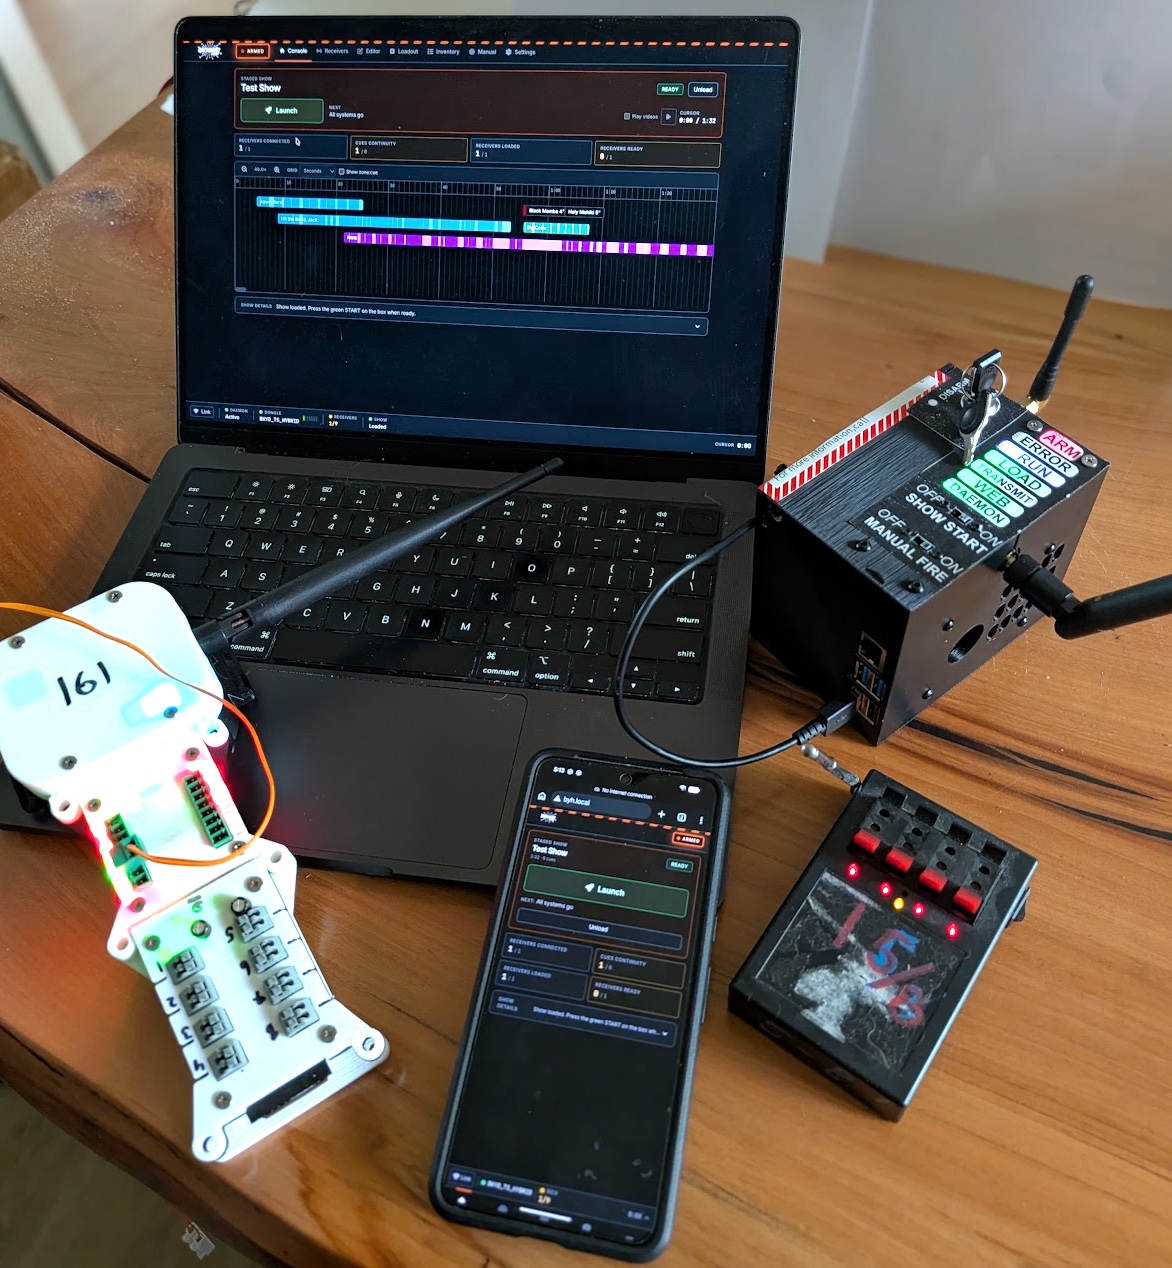
The host app is a Next.js web UI run from your laptop (or a Raspberry Pi) paired with a Python daemon that talks to the dongle over USB. Together they handle four jobs, in roughly the order you'd actually use them.
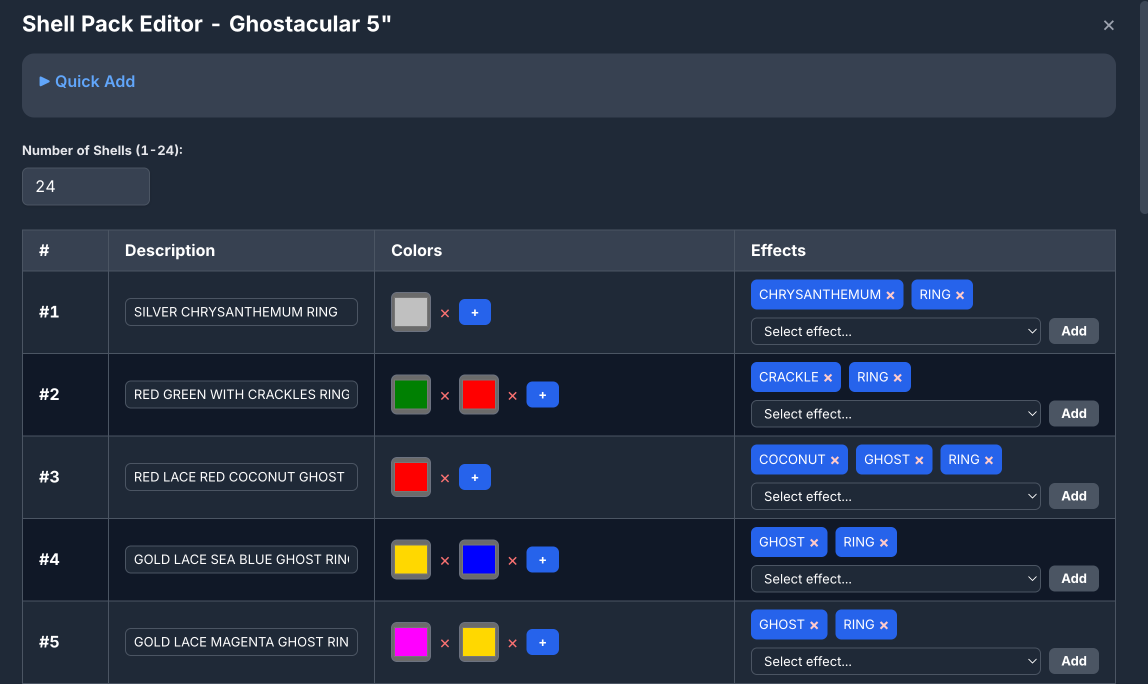
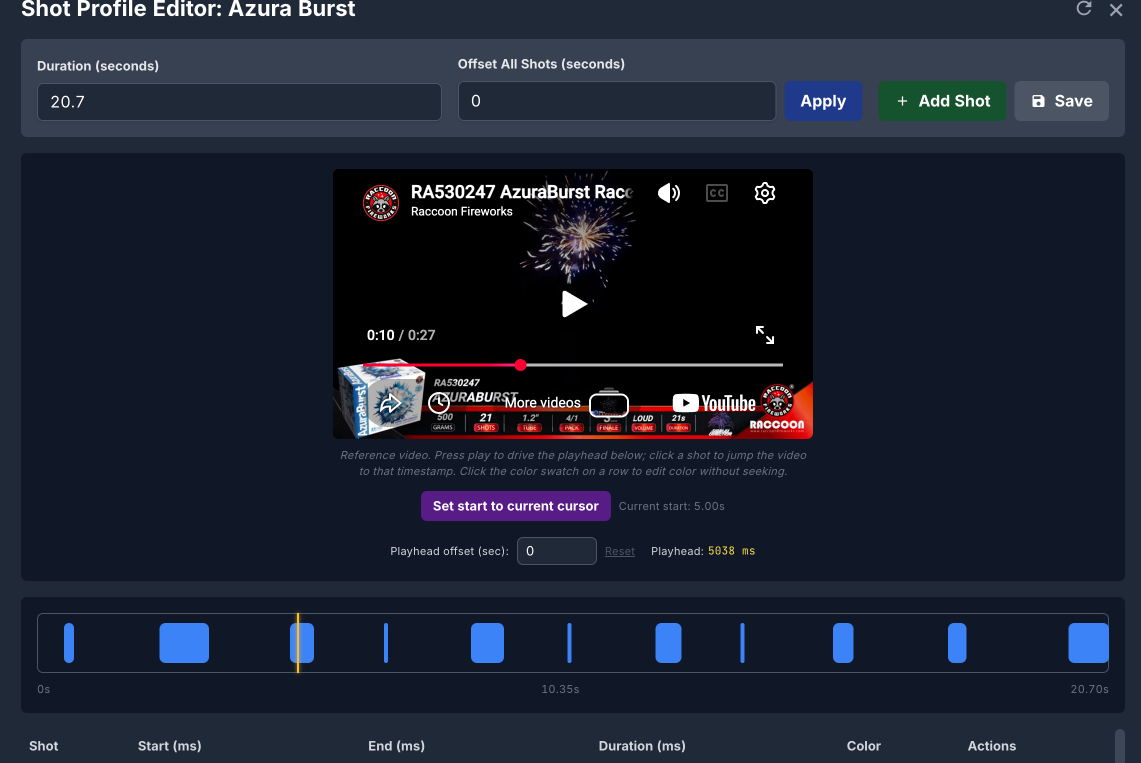
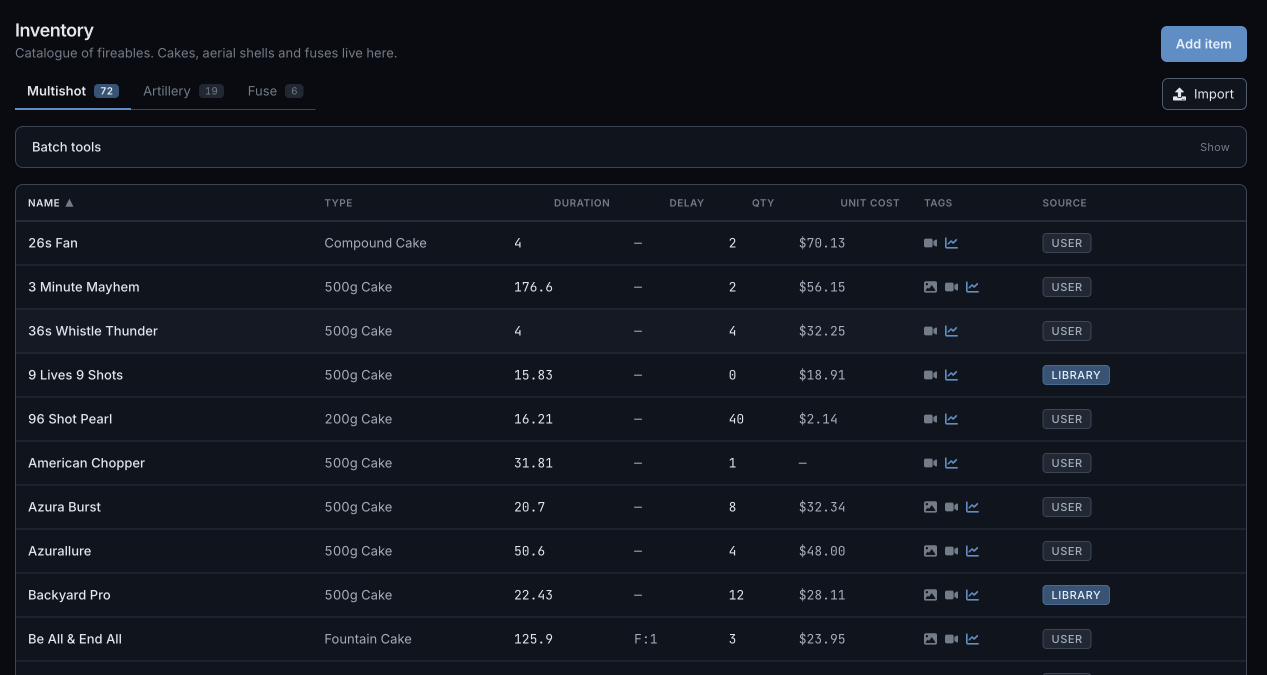
Inventory and cataloging
assets/img/ui/cloudcatalogimport.png
assets/img/ui/shell-editor.png
assets/img/ui/shotprofile1.png
assets/img/ui/inventorytoplevel.png
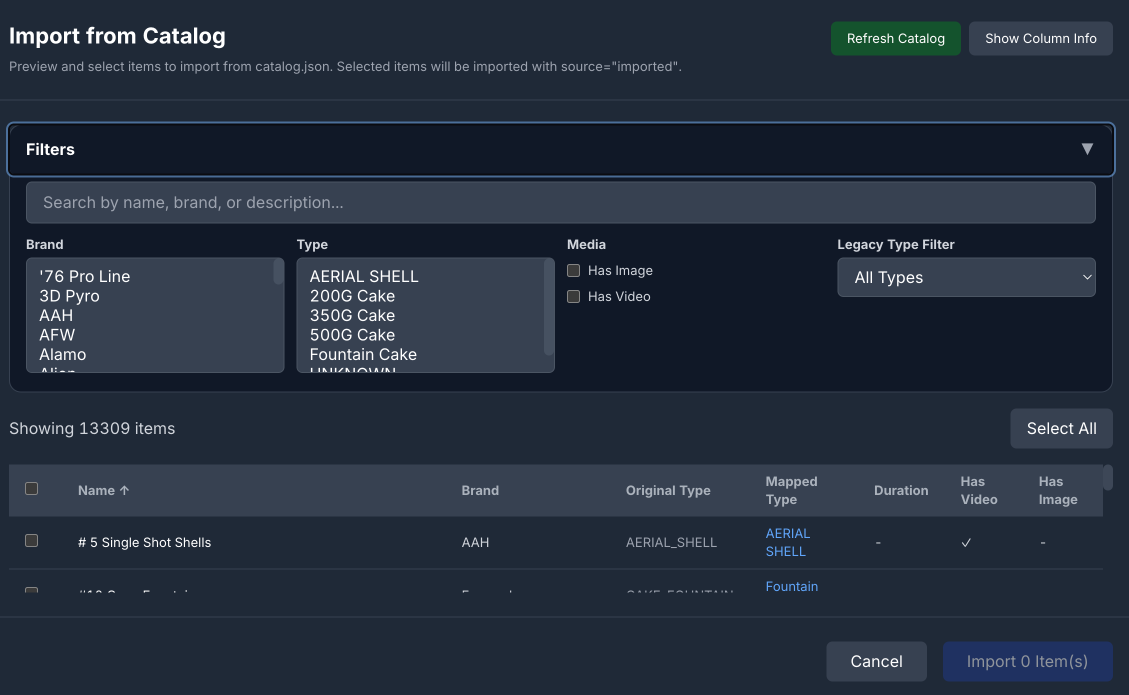
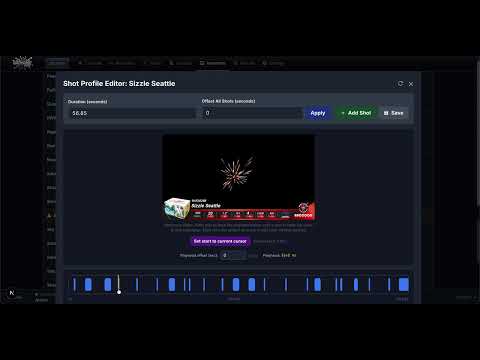
Before designing a show you need to know what you have. The app imports from a 10,000+ shell catalog so you don't type entries by hand. It parses pasted artillery-shell effect lists into individually-tagged shell entries, with extracted color and effect tags that drive search later. For cakes, it analyzes a YouTube reference video and builds a shot profile — every shot, marked on the timeline, color-codeable per-shot. Quantity and price are tracked once and used everywhere downstream.
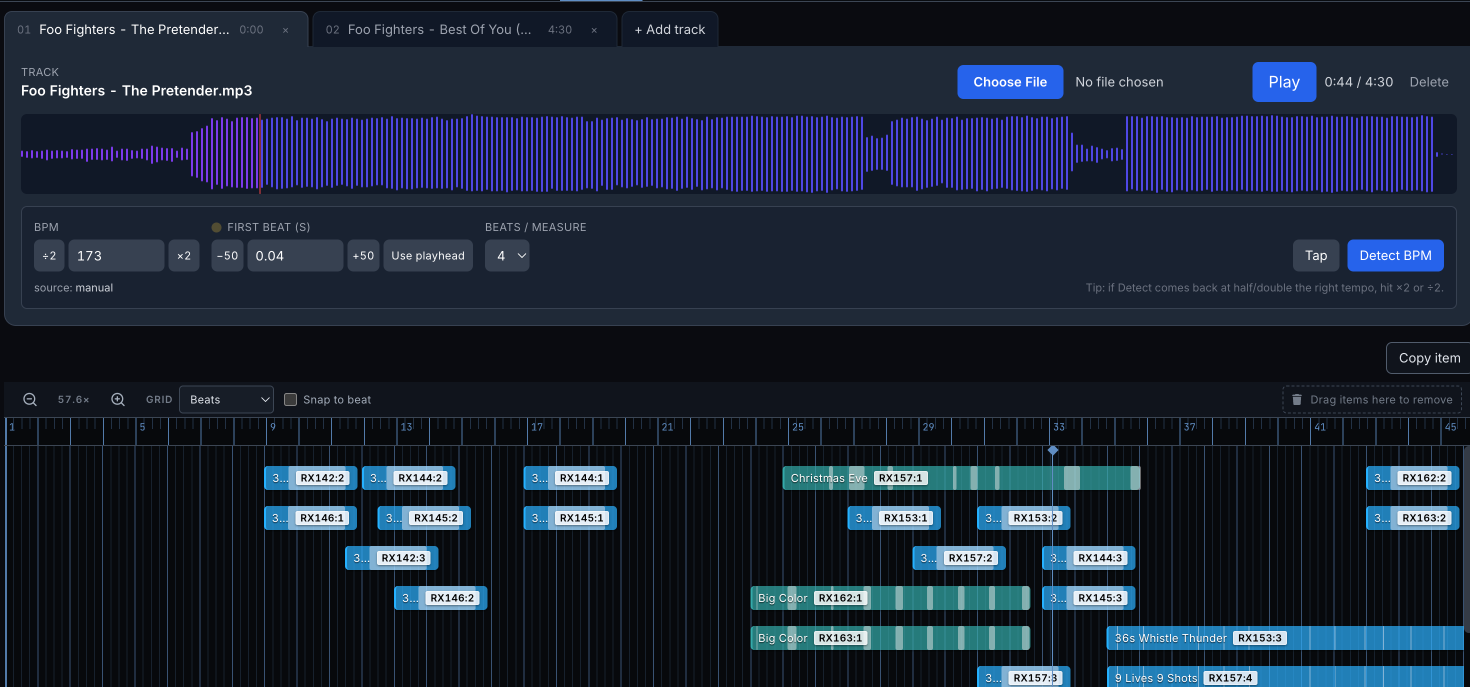
Show building
assets/img/ui/pyromusic.png
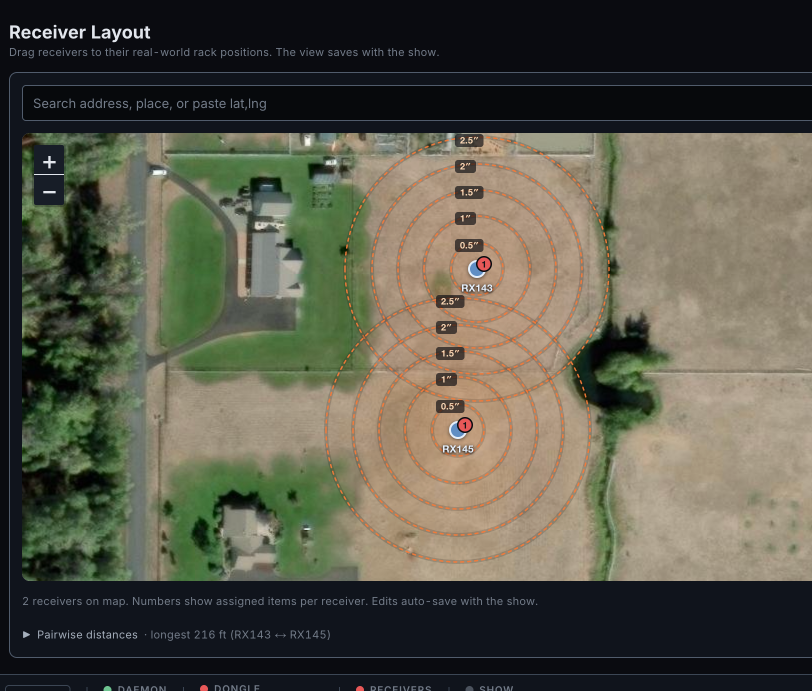
assets/img/ui/ui-safety-rings.png
assets/img/ui/rackeditor1.png

assets/img/ui/show-stats.jpg
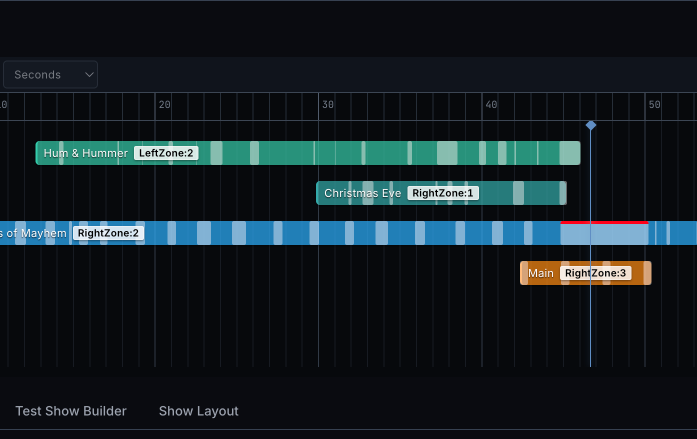
Drop an audio track and the timeline lights up with detected beats; cues drag onto the timeline and snap to the beat grid. The field layout is a satellite-image canvas with safety rings drawn at the 75-ft-per-bore-inch rule, so spacing problems are visible before they're built. The rack editor handles fuse routing properly — burn rate, tube-to-tube distance, lift-fuse distance — and computes the resulting per-shot timing so the show output reflects what actually happens on the field, not what was clicked. Show stats roll up total cost, cost per minute, peak simultaneous pieces, and density over time.
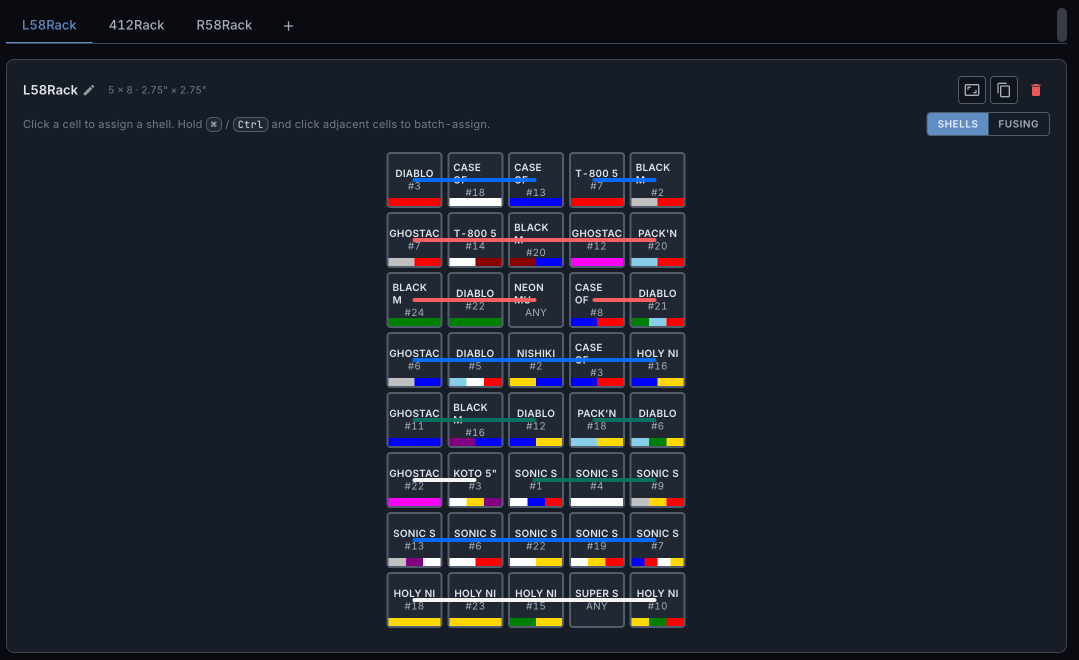
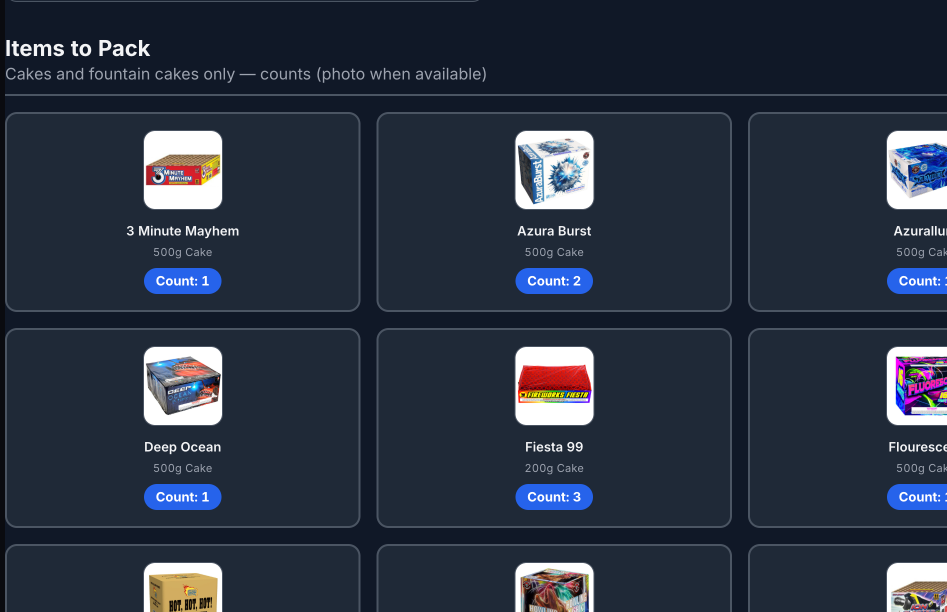
Loadout exports
assets/img/ui/loadout1.png
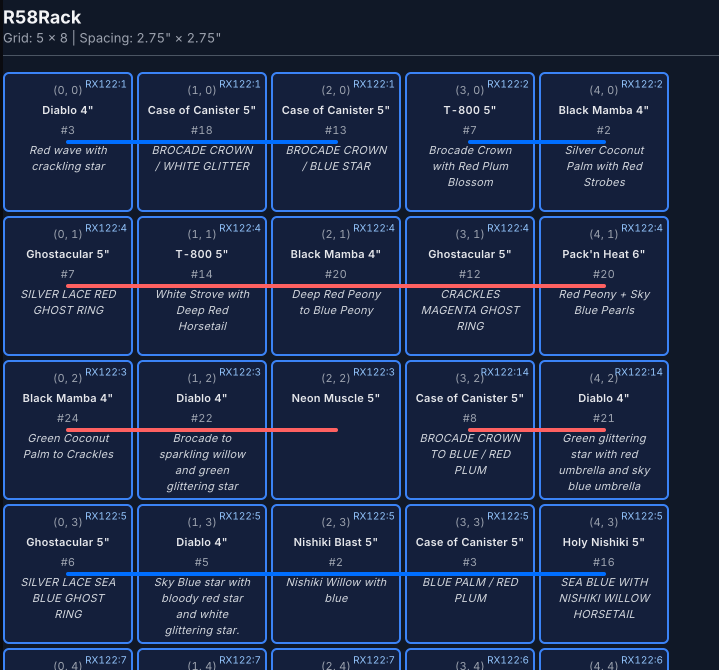
assets/img/ui/loadout3.png
assets/img/ui/loadout2.png
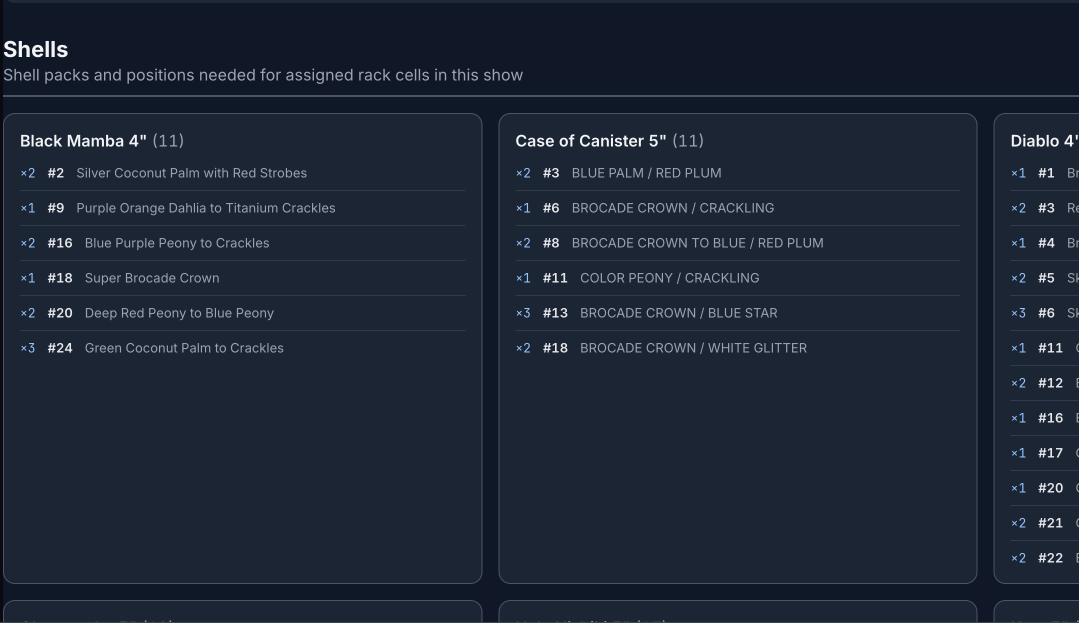
When the design is done, the app generates the paperwork. A printable pick list of what to pull from the stash. Per-rack diagrams that show the specific shell in each cell and the exact fuse-cut lengths between tubes. Cue-assignment sheets with photos of each item next to its cue number, so the person wiring at 9 PM with a headlamp doesn't have to guess. The paperwork is the part you actually take to the field, so it's intentionally print-friendly and unambiguous.
Live runtime

assets/img/ui/manual-firing.jpg

assets/img/ui/receiver-add.jpg
assets/img/ui/settingsprev1.png
assets/img/ui/shottimetimeline.png
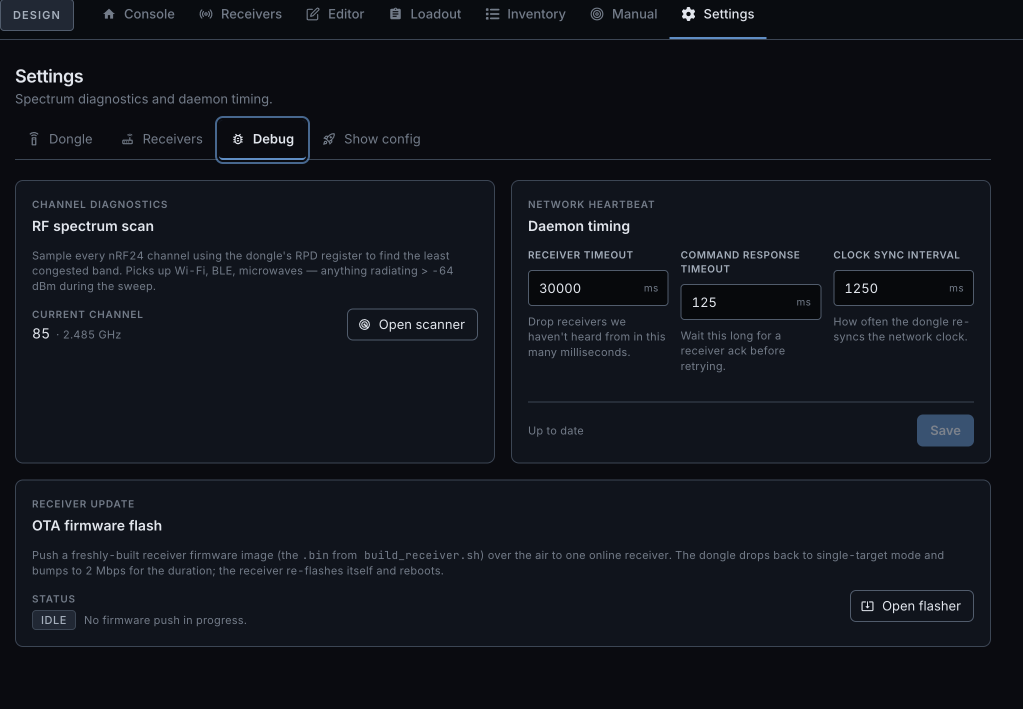
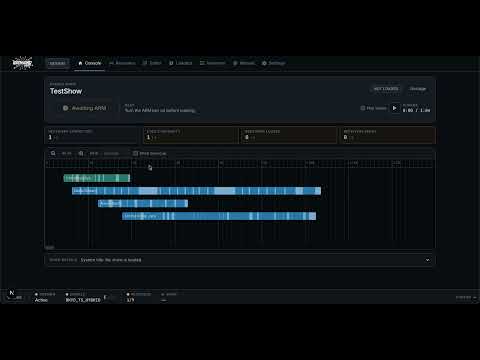
Three live screens. Manual fire is for testing cues outside a show — useful for continuity passes or tiny displays. The receiver panel surfaces per-receiver signal, battery, continuity grid, ready count, and success percentage. The runtime dashboard is what you actually look at during the show: timeline progress, live telemetry, and a one-touch abort. If the host loses contact with a receiver for more than ten seconds, the receiver stops on its own.
Walkthroughs
Short screen recordings of the parts of the app that are hardest to convey in stills. Recorded walkthroughs link out to YouTube; the remaining placeholder paths describe clips still to make.
-
Aerial shell auto-import
Paste an effects list, watch parsed shells appear with color/effect tags, fine-tune fuse + lift delays.
 Watch on YouTube
-
Cake shot timing from YouTube
Point the app at a reference video, generate a shot profile, drop it onto a show timeline.
 Watch on YouTube
-
Pyromusical & beat snapping
Import a track, detect beats, snap cues to the grid, scrub through a section.
60–120 s ·
assets/yt/pyromusical.txt -
Manual firing
Arm, run continuity, fire individual cues for testing.
 Watch on YouTube
-
Receiver management (TODO)
Add a BYH receiver and a Bilusocn-style receiver side by side; walk the health panel.
90–150 s ·
assets/yt/receiver-interface.txt